Have you ever wondered if you could fix your trusty electric toothbrush when it starts to falter? In a world increasingly focused on sustainability and extending product lifecycles, the thought of repairing a gadget rather than replacing it holds significant appeal. Electric toothbrushes, while seemingly simple, are intricate devices with various components that can sometimes be fixed with a bit of know-how and the right tools. This guide will walk you through the process of disassembling an electric toothbrush, offering insights and practical steps for common repairs.
What is an Electric Toothbrush and Why Disassemble It?
An electric toothbrush is a dental hygiene device that uses an electric motor to move the brush head, either by oscillating, rotating, or vibrating at high frequencies, to clean teeth more effectively than a manual brush. These devices typically consist of an outer handle (casing), an internal mechanism (motor, printed circuit board or PCB, and battery), and a removable brush head.
Over time, various issues can arise, prompting the need for disassembly. The most common reason is a failing battery, which can lead to reduced power or the toothbrush failing to charge altogether. Other motivations include:
- Battery Replacement: The primary reason for opening a rechargeable electric toothbrush.
- Cleaning Internal Components: Toothpaste and water can seep inside, leading to corrosion or buildup that affects performance.
- Fixing Loose Connections or Parts: Internal components might become dislodged after drops or prolonged use.
- Troubleshooting Motor Issues: Diagnosing why the brush isn’t vibrating or spinning correctly.
- Curiosity: Understanding the engineering marvel inside your daily oral care tool.
|
Our Picks for the Best Electric Toothbrush in 2026
As an Amazon Associate I earn from qualifying purchases.
|
||
| Num | Product | Action |
|---|---|---|
| 1 | Onlyone Sonic Electric Toothbrush for Adults, Rechargeable Ultrasonic Electric Toothbrush with 8 Brush Heads, Travel Case, Charging Base & Wireless Charging - 5 Modes with Smart Timer |

|
| 2 | Philips Sonicare 4100 Series Electric Toothbrush - Sonic Toothbrush with Advanced Sonic Technology, Pressure Sensor, Two Intensity Settings, Smartimer & Quadpacer, Deep Pink, Model HX3681/26 |
|
| 3 | Philips Sonicare 1100 Series Electric Toothbrush - Sonic Toothbrush with Advanced Sonic Technology, EasyStart, Smartimer & Quadpacer, White, Model HX3641/02 |
|
| 4 | Philips Sonicare 2100 Series Electric Toothbrush - Sonic Toothbrush with Advanced Sonic Technology, Two Intensity Settings, Smartimer & Quadpacer, White, Model HX3661/04 |
|
| 5 | Oral-B iO Simple Clean Rechargeable Electric Powered Toothbrush, Night Black with 1 Gentle Care Brush Head and 1 Black Travel Case - Automatic Pressure Sensor to Protect Gums - 3 Modes - 2 Min Timer |
|
| 6 | Oral-B iO Simple Clean Rechargeable Electric Powered Toothbrush, Pure White with 1 Gentle Care Brush Head and 1 White Travel Case - Automatic Pressure Sensor to Protect Gums - 3 Modes -2 Min Timer |
|
| 7 | Philips Sonicare 4100 Rechargeable Electric Toothbrush, Advanced Plaque Removal, Pressure Sensor, Includes Brush Head Case, White BD5002AZ |
|
| 8 | Oral-B Pro 1000 Rechargeable Electric Toothbrush, White |
|
| 9 | Oral-B Pro 1000 Rechargeable Electric Toothbrush, Black |
|
| 10 | COSLUS Sonic Electric Toothbrush for Adults C40(DY-108Pro): 47000 VPM for Deep Cleaning with Travel Case - 5 Modes for Sensitive Teeth & Brace, Wireless Charging, 6 Brush Heads for Family, Black (1PC) |
|
Benefits of Repairing Your Electric Toothbrush
Opting to repair your electric toothbrush rather than immediately buying a new one offers several compelling advantages. It’s a choice that supports both your wallet and the planet.
- Cost Savings: Replacing a battery or a minor component is significantly cheaper than purchasing an entirely new high-end electric toothbrush. This extends the life of your investment without breaking the bank.
- Environmental Impact: Repairing reduces electronic waste, a growing concern globally. By keeping your toothbrush out of a landfill, you contribute to a more sustainable consumption cycle.
- Skill Development: Tackling a DIY repair project, even a small one, can be a rewarding experience that builds practical skills and confidence in handling electronics.
- Extended Product Lifespan: A successful repair means you can continue using a device you’re familiar with and enjoy, maximizing its utility for many more years.
Understanding Electric Toothbrush Types and Disassembly Approaches
Electric toothbrushes come in several primary types, and their construction can significantly influence the disassembly process. Understanding these differences is crucial before you begin.
- Oscillating/Rotating Toothbrushes (e.g., Oral-B): These models often feature a round brush head that oscillates and rotates. Disassembly usually involves a bottom cap that may twist off, sometimes requiring a specific twisting motion against the charger or careful prying with tools.
- Sonic Toothbrushes (e.g., Philips Sonicare): Known for their high-frequency vibrations, these toothbrushes often have a more sealed design. Accessing the internals can be more challenging, potentially requiring specialized prying tools, heating the casing to soften plastic, or careful separation of seams.
- AAA Battery Powered Toothbrushes (e.g., Philips ONE): These are generally the easiest to disassemble, as they are designed for user-replaceable batteries. A simple coin slot mechanism at the bottom typically allows the end cap to be twisted off, granting direct access to the battery compartment.
Essential Tools for Disassembly and Repair
Before embarking on your repair journey, gathering the right tools is paramount. Having these items on hand will ensure a smoother, safer, and more successful disassembly process.
- Small Flathead Screwdrivers or Spudgers: Essential for prying open stubborn caps or separating casings without causing damage. Plastic spudgers are ideal to prevent scratching.
- Adjustable Spanner or Pliers: For certain models, a spanner or pliers might be needed to grip and twist components at the base of the handle, especially if a specific twisting mechanism is present.
- Soldering Iron and Solder (for battery replacement): Many rechargeable electric toothbrush batteries are soldered directly to the circuit board. A fine-tipped soldering iron is indispensable for safely detaching and reattaching the battery.
- Desoldering Braid or Pump: Used to remove old solder from connections, making battery removal cleaner.
- Replacement Battery: Ensure you have a compatible battery with the correct voltage and size. Lithium-ion and Nickel-metal hydride (NiMH) are common types.
- Tweezers: Useful for handling small wires and components.
- Small Tray or Magnetic Mat: To keep track of tiny screws, springs, and other parts.
- Protective Gloves and Eyewear: Always prioritize safety, especially when dealing with electronics and soldering.
- Hot Water: Some guides suggest immersing the bottom of the toothbrush in hot water for a few minutes to soften the plastic casing, making it easier to pry open.
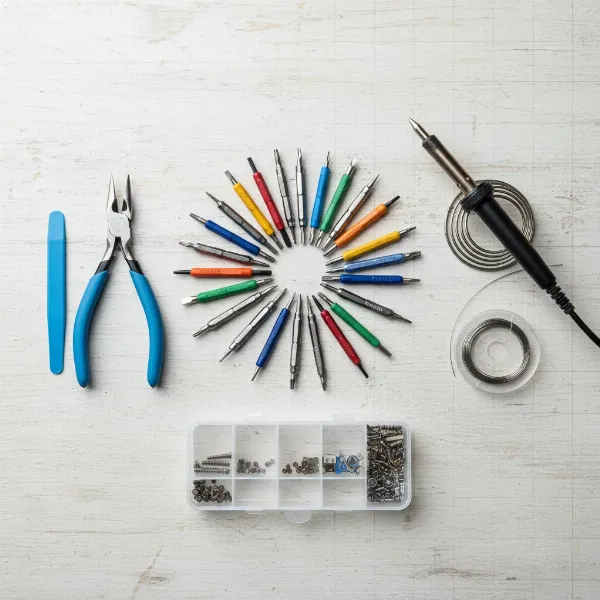 A collection of essential tools for disassembling and repairing an electric toothbrush, including screwdrivers, spudger, pliers, and a soldering iron.
Step-by-Step Guide: How to Disassemble Your Electric Toothbrush
Disassembling an electric toothbrush requires patience and careful attention to detail. Always remember to prioritize safety and proceed with caution.
General Precautions Before Starting
- Unplug the Toothbrush: Ensure the device is completely disconnected from its charger.
- Check Warranty: Be aware that opening your electric toothbrush will almost certainly void its manufacturer’s warranty.
- Handle with Care: Internal components are delicate. Use appropriate force to avoid damage.
- Water Resistance: Note that reassembling may compromise the toothbrush’s waterproof seal, so be extra diligent during reassembly.
Step 1: Remove the Brush Head
This is a universal first step for almost all electric toothbrushes. Simply pull the brush head straight off the handle or twist it slightly, depending on your model, to expose the shaft.
Step 2: Accessing the Base/Bottom Cap
This is often the trickiest part, as it varies significantly by brand and model.
- Twist-off Method (Common for Oral-B iO, Philips ONE, some older models):
- For some Oral-B iO models, place the toothbrush on its charging stand and twist the handle approximately 45 degrees anti-clockwise against the charger. You should feel the base cap unlatch.
- For simple AAA battery models like Philips ONE, insert a coin into the coin slot at the bottom and turn counterclockwise.
- For other twist-off designs, a small adjustable spanner might be placed around the flat part of the plastic near the bottom and twisted anticlockwise until it disengages.
- Prying Method (Common for many Oral-B Pro/Vitality, Philips Sonicare):
- Many models have a bottom cap or a seam that needs to be pried open. Use a small flathead screwdriver or a plastic spudger.
- If the plastic is very rigid, some guides suggest placing the bottom part of the toothbrush in hot water for a few minutes to soften the plastic, making it easier to pry.
- For some Oral-B models, pliers might be used to gently press on the sides of the base to create a small gap, then a screwdriver can be inserted to twist and pop off the cap.
Step 3: Extracting the Internal Mechanism
Once the bottom cap is removed, the internal components usually slide out from the bottom of the handle.
- Gentle Extraction: Hold the outer casing and gently push down on the brush head spindle (the metal shaft where the brush head attaches) against a hard surface. This should cause the internal assembly to slide out from the bottom.
- Mind the Spring: Be very careful not to lose any small springs or rubber seals that might come loose as the mechanism slides out. Set them aside safely.
- Observe Orientation: Pay attention to how the internal components are oriented within the casing; this will be crucial for reassembly.
 An electric toothbrush handle with its bottom cap removed, showing the internal mechanism being carefully slid out, revealing the battery and circuit board.
Step 4: Identifying and Addressing Common Issues
With the internal mechanism exposed, you can now inspect for common problems.
- Battery Replacement:
- Locate the battery, usually cylindrical. Note its polarity (+ and – ends).
- For soldered batteries (common in many rechargeable models), use a soldering iron to carefully desolder the two connections holding the battery to the PCB. Be swift to avoid overheating the components.
- Gently remove the old battery.
- Prepare the new battery (some replacement batteries come with tabs that need to be bent).
- Solder the new battery into place, ensuring correct polarity and strong, clean connections.
- Cleaning Internal Parts:
- Inspect for any toothpaste buildup, water residue, or corrosion on the PCB and other components.
- Use a soft brush (like a dry toothbrush) or a cotton swab with isopropyl alcohol to carefully clean any affected areas. Allow to dry completely.
- Checking Loose Connections:
- Visually inspect all wires and soldered joints for any signs of disconnection or damage.
- If you find loose wires, re-solder them if you have the skills.
Table: Disassembly Complexity by Electric Toothbrush Type
| Toothbrush Type | Common Opening Method | Battery Replacement Difficulty | Common Tools Needed |
|---|---|---|---|
| AAA Battery Powered | Twist-off End Cap (coin slot) | Very Easy (no soldering) | Coin, Screwdriver |
| Oscillating/Rotating | Prying / Twisting Base | Moderate (often soldered) | Screwdriver, Spudger, Pliers, Soldering Iron |
| Sonic | Prying Seams (often tight) | Moderate (often soldered) | Screwdriver, Spudger, Heat Gun (optional), Soldering Iron |
| Ultrasonic | Highly Sealed (complex) | High (usually soldered) | Specialized tools, Soldering Iron |
Reassembly Tips and Best Practices
Reassembling your electric toothbrush correctly is as important as disassembly to ensure its proper function and, crucially, its water resistance.
- Reverse the Steps: Follow your disassembly steps in reverse order.
- Align Components: Ensure that the internal mechanism, particularly the power button and charging contacts, aligns perfectly with the cutouts and features of the outer casing. If not aligned, the toothbrush may not function or reassemble correctly.
- Secure All Parts: Make sure all components, especially the spring, are correctly seated before attempting to close the casing.
- Sealing for Water Resistance: This is critical. Ensure that any rubber seals are perfectly in place and undamaged. When reattaching the bottom cap, apply firm, even pressure until it snaps or twists securely into place. A compromised seal can lead to water damage, rendering your repair useless.
- Initial Charge and Test: After reassembly, place the toothbrush on its charger for an initial “activation” charge (sometimes 10 seconds is enough to trigger the circuitry, followed by a full charge). Then, test its functionality.
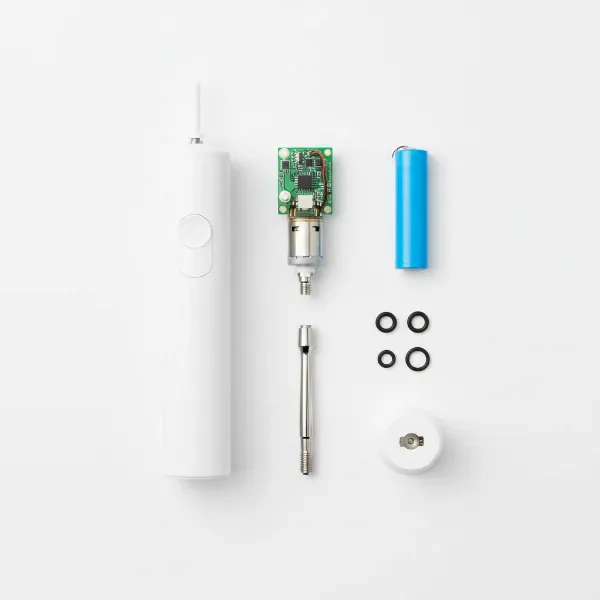 A neatly organized display of a fully disassembled electric toothbrush, showing its various internal and external parts.
When to Seek Professional Help or Replace
While DIY repair can be rewarding, there are times when it’s more practical to seek professional assistance or consider a full replacement.
- Complex or Undiagnosed Issues: If the problem isn’t a straightforward battery issue or you can’t identify the fault, professional diagnostics might be needed.
- Major Motor Failure: Replacing a motor can be complex and expensive, sometimes nearing the cost of a new toothbrush.
- Extensive Water Damage: If water has severely corroded multiple internal components, a reliable repair might be beyond typical DIY capabilities.
- Cost vs. New Unit: Always weigh the cost of parts and your time against the price of a brand-new toothbrush, especially for older or basic models. For very high-end models, repair might be more economical.
> “While many electric toothbrush issues can be resolved with basic tools and a bit of patience, it’s crucial to understand your limitations. Attempting complex repairs without the right expertise can sometimes cause more damage than good.” – John Smith, Electronics Repair Specialist
Conclusion
Disassembling an electric toothbrush for repair might seem daunting at first, but with the right approach and a clear understanding of your model, it’s a manageable task. Whether you’re replacing a worn-out battery, cleaning stubborn internal grime, or simply troubleshooting, taking the DIY route can save you money and contribute to a more sustainable lifestyle. Remember to prioritize safety, use appropriate tools, and pay close attention to the delicate internal components. By following these guidelines, you can extend the life of your electric toothbrush, ensuring it continues to provide effective oral care for years to come. What common electric toothbrush issue are you hoping to tackle first?
Frequently Asked Questions
Does disassembling my electric toothbrush void the warranty?
Yes, in almost all cases, opening your electric toothbrush will void its manufacturer’s warranty. It’s advisable to check your warranty status before attempting any repairs.
What should I do if my electric toothbrush stops vibrating?
First, ensure the brush head is securely installed. If the problem persists after disassembly, check for loose internal parts, signs of water damage, or a failing motor. Battery issues can also cause reduced vibration intensity.
Can water damage be repaired in an electric toothbrush?
Minor water damage, such as light corrosion on contacts, might be cleaned with isopropyl alcohol after the device has completely dried. However, extensive water damage to the circuit board or motor often requires professional repair or replacement of affected components, which can be costly.
What type of battery do electric toothbrushes use?
Most rechargeable Electric Toothbrushes use either Nickel-metal hydride (NiMH) or Lithium-ion batteries. Disposable battery models typically use standard AAA alkaline batteries. Ensure you match the exact battery type, voltage, and size when replacing.
Is it always worth repairing an old electric toothbrush?
It depends on the toothbrush’s age, the severity of the damage, and the cost of replacement parts versus a new unit. For simple battery replacements in otherwise functional higher-end models, repair is often cost-effective. For very old or heavily damaged models, buying a new toothbrush might be more practical.